In today’s digital age, hyperlinks are everywhere. They take you from one website to the next, they link to other pages on the same site, and even within a document. But have you ever wondered how to make links clickable?
In this blog post, we’ll be exploring the step-by-step process of making hyperlinks clickable.
We’ll cover everything from hyperlink basics to reasons why you should make a link clickable.
Additionally, we’ll walk you through four different methods for creating a clickable hyperlink including using WordPress Classic Editor, WordPress Block Editor (Gutenberg), HTML, and any Graphical User Interface (GUI).
We’ll also provide you with tips for making hyperlinks in various platforms like email, Instagram stories, YouTube video descriptions, and Google Docs using both a computer and a mobile app.
So let’s dive in and learn how to make links clickable!
Hyperlink Basics
Here is a brief overview of some hyperlink basics:
- A hyperlink is a text or image that you can click on to jump to a new document or a new section within the current document. Hyperlinks are what make the web a web – they connect web pages and allow you to move from one page to another seamlessly.
- Hyperlinks are defined using HTML tags. The main tag is the anchor tag <a>. You designate the start of a hyperlink with an opening <a> tag and the end of the hyperlink with a closing </a> tag.
- Between the opening and closing anchor tags goes the hyperlinked text or image that the user clicks on. For example: <a>Click here</a>
- The destination of the hyperlink is specified in the href attribute of the opening <a> tag. For example: <a href=”https://www.example.com”>Click here to go to example.com</a>
- Hyperlinks can link to other web pages, files, locations within the same page, email addresses, and more. The target doesn’t have to be online – it can link to local files too.
- You can customize links to open in a new browser tab, change colors when visited, and more using other HTML attributes like target, title, style, etc.
Content
You can make links that can be clicked in two ways: using words or using pictures. So, if the program or app you’re using lets you use links, you can select any written sentence or picture and make it a link that people can click on.
Hyperlinked Text
When you want to create links that can be clicked, you can use written words as one option.
For example, in editors like WordPress, you can choose the words you want to turn into a link. After selecting those words, you can click on a button called “Link.”
This makes the chosen words on the website look different, usually with color and a line underneath.
Sometimes, when you move your mouse over a linked word, its appearance might change. It could change color or remove the line underneath to show it’s a link you can click.
Also, when you hover your mouse over a linked word, most browsers will display a small preview showing the web address it leads to. This helps you know where the link goes before you click it.
Hyperlinked Images
Lots of programs, such as WordPress, allow you to make links using pictures instead of just words.
Here’s how it works: you pick an image on the editing part of the website and attach a web address to it using a Link function.
After you’ve published it, when people move their mouse over the picture, the arrow cursor changes into a hand cursor. They’ll also see a sneak peek of the web address the picture leads to.
Whether it’s a picture or words you click on, both will do something when you click them, like taking you to another website.
nofollow, noreferrer, and noopener
You can add extra things to a link that help with security or hide it from search engines:
- nofollow: This stops some “SEO link juice” from going to the linked website. It helps protect your site and might hide the link from search engines.
- noopener: If you make a link in WordPress that opens in a new tab, this bit of code automatically comes with it. It helps with certain security problems.
- noreferrer: Often used with noopener, this code stops the target site from getting information about where the link came from. It adds more security and might stop tracking sites and affiliate earnings sites from collecting data.
You can’t see these things just by looking at a link on the website. You have to check the HTML code to find them.
Reasons You Might Want To Make a Link Clickable
As a leader in SaaS link building, VH-info understands the importance of making links clickable. When we build high-quality backlinks for clients, we always properly hyperlink citations to optimize citation flow and redirect maximum link equity.
Hyperlinked mentions create a smoother user journey for readers. Instead of needing to manually input URLs, readers can seamlessly access cited resources with one click. This convenience encourages better engagement.
Beyond user experience, clickable links also allow VH-info and our clients to easily track traffic sources and metrics. We rely on these data points for monitoring link building KPIs and identifying optimization opportunities. Unclickable URL mentions lead to incomplete analytics.
We advise all our clients to make links clickable on their sites as well. This best practice enhances technical SEO while also showcasing relevance and building user trust. The improved citation flow also redirects more link equity to boost search rankings.
Our link building experts can help implement clickable links across your website. When you’re learning how to make a link clickable, it’s helpful to know why we use links. This helps you understand what they can do and how to use them better later on.
Here are the main reasons why you might want to make a link clickable:
- Linking to other websites or pages: You can create links that take people away from your site (like when citing sources) or direct them to other pages on your site (great for guiding readers to related content).
- Linking images: You can make pictures clickable on WordPress or other website builders. This helps link them to web pages or other media.
- Linking buttons: Using CSS buttons, you can make visually appealing clickable links instead of plain text.
- Phone numbers: Links to phone numbers allow users to directly call through apps like their phone’s dialer or Skype.
- Addresses: Links to map coordinates can open map apps like Google or Apple Maps for directions.
- Email addresses: Clicking these links starts composing emails using the default email app with the recipient’s email already filled in.
- Anchor links: These are links that jump to specific parts of the same page, often used for creating a table of contents in long blog posts.
- Downloadable files: You can link files like PDFs or images for users to download directly to their devices from your website.
Understanding these different types of links and why they’re useful will help you learn how to create and use them effectively.
How To Make Links Clickable?

The way you make a link can depend on how familiar you are with it. You can go for an easier way where you see things visually or use HTML code if you’re more experienced.
Here are the four main ways to make a link clickable:
- Using the WordPress Classic Editor
- Using the WordPress Block Editor (Gutenberg)
- Using HTML
- Using any Graphical User Interface (GUI)
Remember, these methods work similarly for both posts and pages on WordPress. They can also be helpful for other apps or website builders, but there might be some differences in how things are named or how they work.
Method 1: Using the WordPress Classic Editor
When you’re using the WordPress Classic Editor, the simplest way to create a link that people can click on a post or page is by using the Visual editor tab.
Here’s what you do: First, head to the Posts or Pages part of your WordPress dashboard. Then, choose the specific page or post you want to change, and make sure you’re using the Visual tab.
Step 1: Highlight the Text You’d Like to Make Clickable
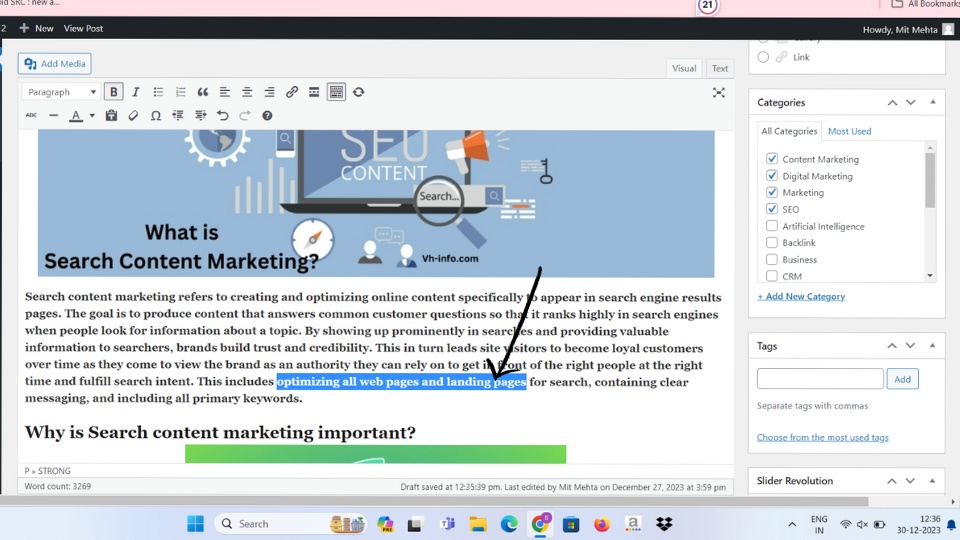
If you want to create a link using text, start by typing the text in the Visual editor. Then, use your mouse to select or highlight the text you want to turn into a link.
If you want to make an image clickable:
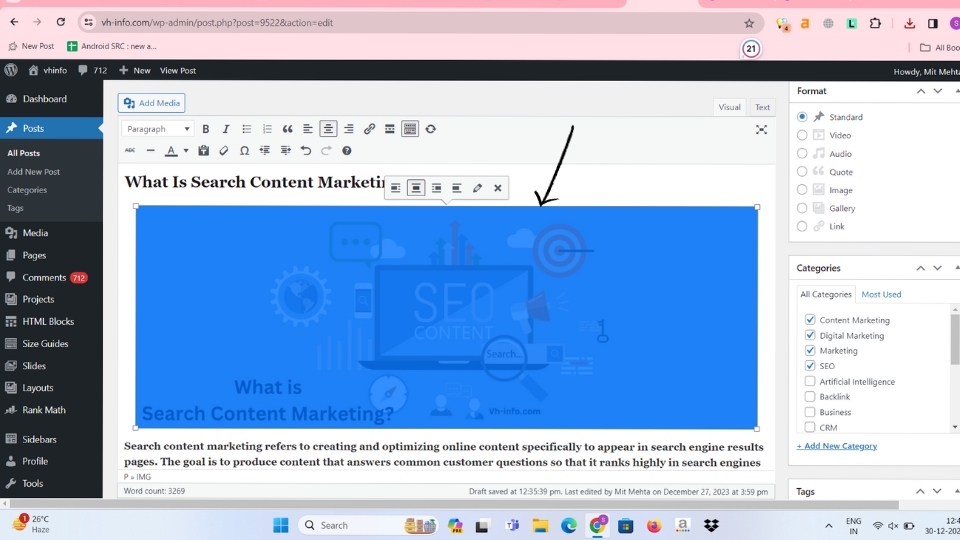
Click on the image to select it. You’ll know it’s selected when you see a toolbar and a border around the image in the editor.
Step 2: Click the Insert/Edit Link Button

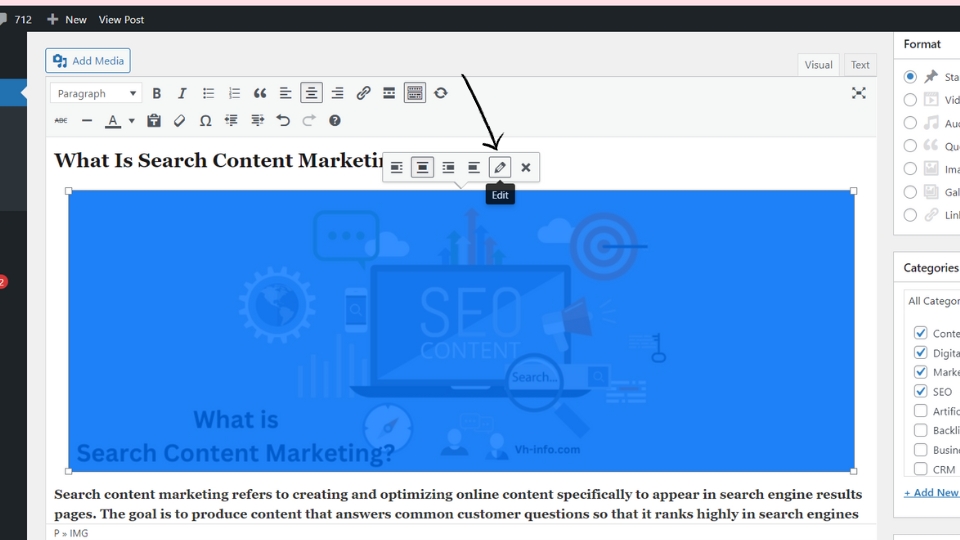
If you’ve highlighted the text, move your cursor to the button in the Visual Editor that looks like a chainlink. It’s called the Insert/Edit Link button.
If you’ve selected the image, click on the Insert/Edit Link button (the one that looks like a chainlink) while the image is still chosen.
Step 3: Paste in a URL

When you click the Insert/Edit Link button, a box will pop up with a blank space for the web address (URL). Copy the link you want to use (you can do this by pressing Command + C on Mac or Ctrl + C on Windows) from another website or your own.
Then, paste that link (by pressing Command + V on Mac or Ctrl + V on Windows) into the blank space provided.
If you’re turning an image into a clickable link, paste the link into the box that appears and click the Apply button to make the link active.
Step 4: Apply the Link
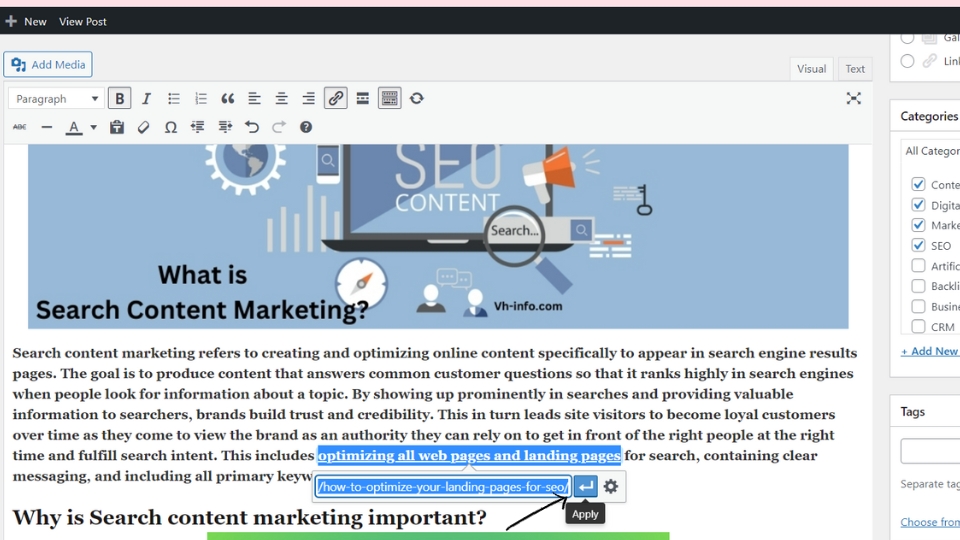
Press the Apply button to make the text a clickable link.
After doing this, your text with the link will look different. It might be underlined and could even be a different color.
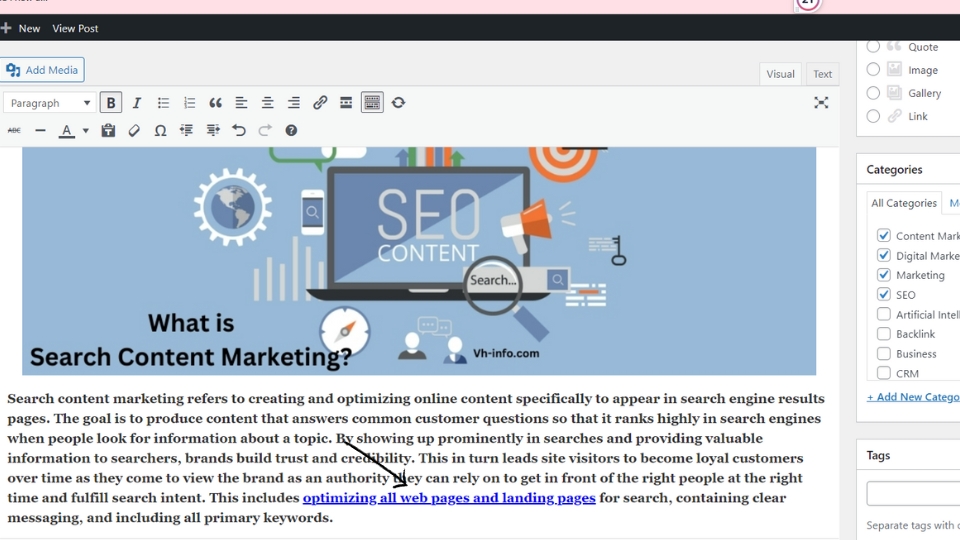
If you click on the link in your editor, you’ll see the actual link and get options to edit it if you want to make changes.
Method 2: Using the WordPress Block Editor (Gutenberg)
Links work similarly in both posts and pages when using the WordPress Block Editor.
First, go to the Posts or Pages part in your WordPress dashboard. Choose the specific post or page you want to edit, then follow the steps below.
Step 1: Highlight Some Text

Write some words in the editor. Use your mouse to select the part of those words you want to turn into a link. Click on the Link button in the toolbar that pops up.
If you want to make an image clickable in the WordPress Block Editor:
First, add an image to the editor by clicking the Add Block button. Then select the Image block and upload the image you want to use.
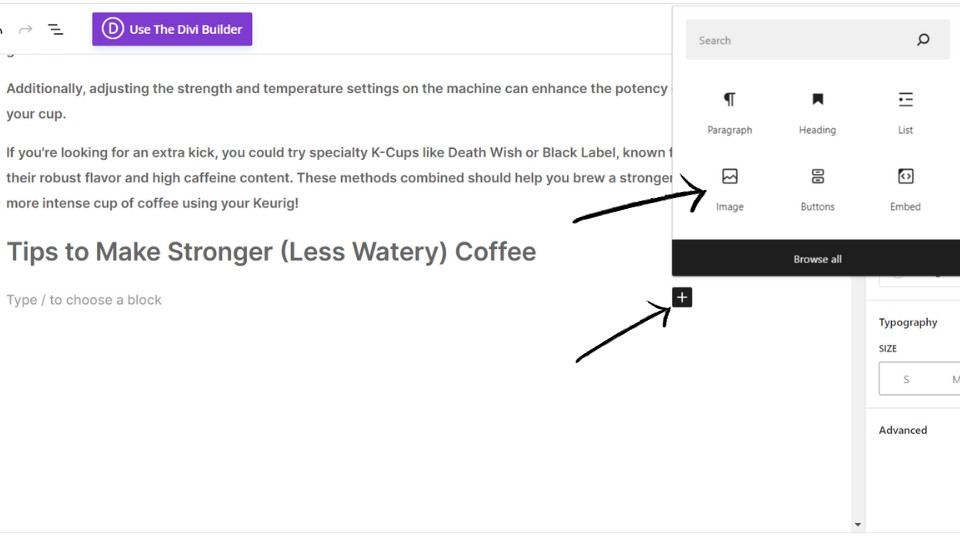
Click on the image to select it, then click the Insert Link button in the toolbar that appears.
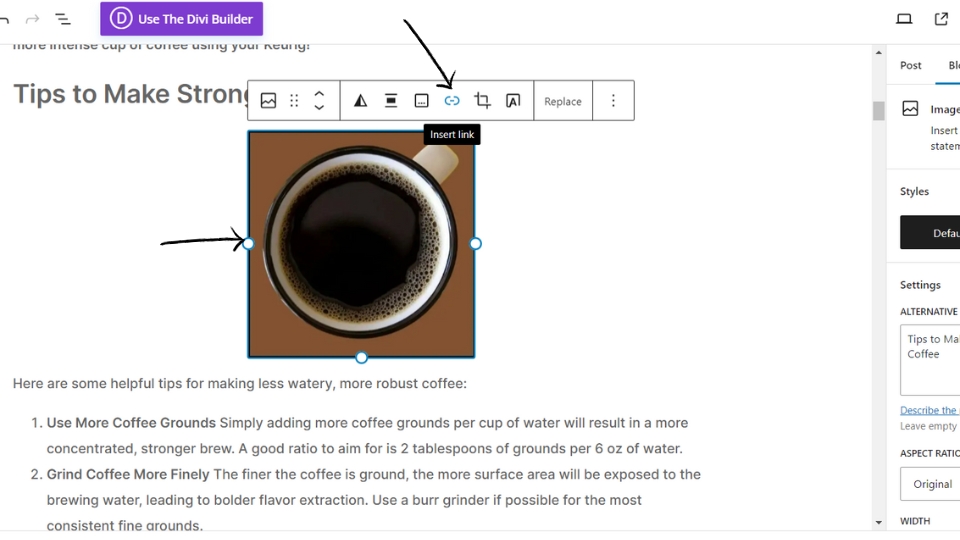
Step 2: Paste in the URL and Submit the Link

A box will pop up with a space for a web address (URL). Paste the link you want to use and then press Enter on your keyboard or click the Submit button. This will make the link clickable.
Once you do this, the linked text might change color. Clicking on the link allows you to preview the linked content and access more advanced linking settings.

If you want to make an image clickable:
You can link it to media files or attachment pages if you want. Otherwise, paste the URL into the empty link box. Click the Apply button to activate the link. After publishing, anyone who clicks on the image will go to the link you added.
For more options, click the down arrow (v) button to:
- Open the link in a new tab
- Add Link Rel
- Add Link CSS Class
Method 3: Using HTML
To make a clickable link in HTML, follow these steps:
Wrap the text or image you want to be clickable inside an anchor (<a>) tag.
For example: <a>Click Here</a>
Add the href attribute to specify the destination URL.
For example: <a href=”https://www.example.com”>Click Here</a>
The text between the opening and closing <a> tags will now be clickable to take the user to the URL specified in the href attribute.
Method 4: Using any Graphical User Interface (GUI)
Most user interfaces provide a way to insert hyperlinks without writing HTML code.
Here is the general process:
- Highlight the text or image you want to make clickable.
- Click the “Insert Link” or “Hyperlink” button (location varies by application).
- In the dialog box that opens, enter the desired destination URL.
- Configure any other link settings like whether to open in a new tab.
- Click “Insert” or “Apply” to make the selection clickable.
- Visually confirm the link formatting has been applied to know it worked.
So, GUIs provide an interface to add links without touching code. The process involves selecting text, opening the hyperlink dialog, entering the target URL, and finalizing formatting changes.
How To Make a Hyperlink?
Links are really important for moving around the internet, and most people use them without even thinking about it.
You see links in blog posts, Word documents, PDFs, and emails.
We only really think about links when we want to put one into some text.
There are two main ways to put links into things:
- Using a visual editor
- Using HTML code
How Do I Make a Clickable Link in WordPress?
Here are the steps to make a clickable link in WordPress:
- When editing your page or post content in the WordPress editor, highlight the text you want to make clickable.
- Click the “Insert/edit link” button in the editor toolbar (it looks like a chain link).
- In the dialog box that opens, enter the destination URL you want the text to link to in the “URL” field.
- Open the “Target” dropdown and choose whether you want the link to open in a new tab or the same tab when clicked. Selecting “Open link in a new tab” is generally recommended.
- Add a “Title” for the link if desired. This will display a tooltip when users hover over the link.
- Click “Add Link” to make the selected text clickable to the URL you specified.
- Visually confirm in the editor that the text is now formatted as a clickable blue link.
- Update or publish your WordPress page/post for the link to go live on your site.
And that’s it! These same steps can make both text links or image links in WordPress site content. The editor makes adding clickable links user-friendly.
How to Make a Link Clickable in Email?
Here are the steps to make a clickable link in an email:
- Type out the text you want to be linked. This text will be clickable for the recipient. For example: “Check out my website“
- Highlight the text and click the link icon or hyperlink button in your email client. In Gmail, this looks like two chain links. In Outlook, this is an icon that looks like a globe and chain link.
- In the pop-up box, paste in the destination URL you want the text to link to. For a website link, this would be the full web address, like “https://www.mywebsite.com“.
- Configure any other link settings offered in the pop-up box:
- Open in new window/tab
- Add a title tooltip
- Change the display text
- Save the link. The text should now appear as blue, underlined, and clickable.
- You can repeat steps 1-5 to add additional links by highlighting other text and assigning it a URL.
- When your email is sent, the recipient will be able to click the link to navigate directly to the destination web page or file you linked to.
Be sure to test your links before sending your email to check they work correctly! Adding clickable links enhances emails and connects information.
How To Create a Hyperlink in Word?
Here are the steps to create a hyperlink in Microsoft Word:
- Highlight the text in your Word document that you want to turn into a clickable link. You can also right-click an image and select “Hyperlink” to make an image clickable instead of text.
- Under the “Insert” tab in the top navigation bar, click the “Links” dropdown and select “Hyperlink“.
- In the “Insert Hyperlink” dialog box that appears, paste or enter the destination URL for the link in the “Address” field.
- (Optional) Fill out other link options like ScreenTip text, email subject line, or bookmark in your document to link to.
- Click “OK” to apply the link formatting and close out of the hyperlink dialog box.
- The text or image selected should now appear with blue, underlined formatting indicating it is now a clickable link. Hover over the link to test that the cursor changes to the hand icon.
- Click the link to open the linked web page or jump to the designated bookmark destination within your Word document.
To edit or remove a hyperlink in Word, right-click the link and choose “Edit Hyperlink” or “Remove Hyperlink“. Then updating the URL or unlinking your text or image is straightforward.
How Do You Make a Clickable Link with HTML?
Here are the steps to make a clickable link using HTML:
- Place the text or image you want to be clickable inside an anchor tag like this: <a>Click Here</a>
- Add the href attribute to the opening <a> tag and specify the destination URL: <a href=”https://www.example.com”>Click Here</a>
- The text between the opening and closing anchor tags will now be hyperlinked to the URL you added to the href attribute.
For example, a full HTML clickable link could look like: <p>Visit my <a href=”https://www.mywebsite.com”>website</a> to learn more.</p>
Some things to note:
- You can use an image or any other HTML element instead of text inside the anchor tag.
- You can add a target=”_blank” attribute to open the link in a new browser tab.
- Links will appear blue and underlined by default. You can customize appearance with CSS.
So, the anchor tag plus href attribute are used in HTML to define clickable links pointing to other web pages or files online!
How to Add a Link to an Instagram Story?
Here are the steps to add a clickable link to an Instagram Story:
- Create your Instagram Story as usual by tapping the camera icon or uploading a photo/video.
- As you add text boxes, stickers, or graphics to the Story, select the element you want to be clickable.
- In the toolbar at the top, tap the chain link icon to open the “Add Link” menu.
- Paste or enter the URL you want viewers of your Story to go to when they click/tap the element.
- You can also customize what happens when people click by choosing “Website” vs “Fundraiser” vs other options.
- Tap “Done” in the top right corner to apply the link.
- Now when viewers see that Story element, they will be able tap it go directly to the website or fundraiser page you linked to.
- Don’t forget to actually publish your Story once finalized so it goes live for your followers!
And that’s all it takes to make shoppable, educational, or interactive Instagram Stories using clickable links or swipe up links. Get creative in connecting your digital content!
How to Add a Link to a YouTube Video Description?
Here are the steps to add a clickable link to a YouTube video’s description:
- Go to YouTube Studio and select the video you want to edit. Click on the “Edit” button.
- Under the section labeled “Video description“, type out the text you want viewers to click on, like “Check out my website for more”.
- Highlight the text you just typed that you want to become a link.
- Click the chain link icon above the description box, this will open the “Insert link” dialog box.
- In the URL field, paste in the webpage URL you want the text to link to when clicked.
- Configure additional options like whether the link should open in a new tab. Then click “Apply”.
- The highlighted text should now appear blue and underlined, indicating it is now a clickable link.
- Click “Save Changes” at the bottom and view your video to test the live link.
Now when users read your video description, they will be able to seamlessly click for more information! Adding links provides great opportunities to engage viewers long after the video ends.
How to Hyperlink in Google Docs using a Computer?
Here are the steps to add a link in Google Docs:
- Open the document using Google Docs in a web browser.
- Choose the text you want to turn into a link.
- Click the Insert link button in the toolbar. It looks like a chain link. A box will appear.
- In the box that shows up, type or paste the web address (URL) you want to link to. You don’t always need to include “http://” at the start of the web address. For example, you can just type “Vh-info.com.” But it’s better to copy the URL from your web browser’s address bar to avoid errors.
- Click Apply to finish.
You can also turn text into a link by highlighting it and pressing Command + K on a Mac or Control + K on a PC. Then, follow the same steps to add your link.
If you need to change the link later, just click on it, and a menu will pop up. You can then copy the link, edit it, or remove it completely.
How to Hyperlink in Google Docs using the Mobile App?
- Open a document in the Google Docs app on your iPhone or Android phone.
- Pick the words you want to link. A toolbar will show up below those words.
- Tap “Insert Link.”
- Type or paste the web address (URL) you want to link to on the page that appears.
- When you finish, tap the checkmark at the top right corner of the screen.
Conclusion
In conclusion, creating clickable links is essential for enhancing the user experience and improving website navigation.
By making your links easily clickable, you can increase engagement and encourage visitors to explore more of your content.
Whether you are using the WordPress Classic Editor, the Block Editor, HTML, or any GUI, the process of making links clickable is straightforward and can be done in just a few simple steps.
Remember to consider the purpose of your links and ensure they add value to your content.
So, start implementing clickable links today and make it easier for your audience to navigate your website and access the information they need.

